Roof Insulation Vents: Maximizing Attic Efficiency
“A well-ventilated attic is a healthy attic.”
Introduction:
Roof insulation vents are the unsung heroes of any roofing system—working together to regulate temperature, control moisture, and extend the life of your insulation and shingles. Whether you’re retrofitting an older home or installing a new roof, understanding how soffit, ridge, baffle, batten, and fascia vents work can make all the difference in achieving peak energy efficiency and preventing costly damage.
Why Roof Insulation Vents Matter
Temperature Control: Proper attic airflow can shave up to 30% off cooling costs by exhausting hot air.
Moisture Management: Continuous ventilation prevents condensation, mold growth, and wood rot.
Insulation Protection: Keeps insulation dry and functional, so your roof performs as designed.
Longevity: Reduces thermal stress on shingles and underlayments, extending their service life.
Types of Roof Insulation Vents
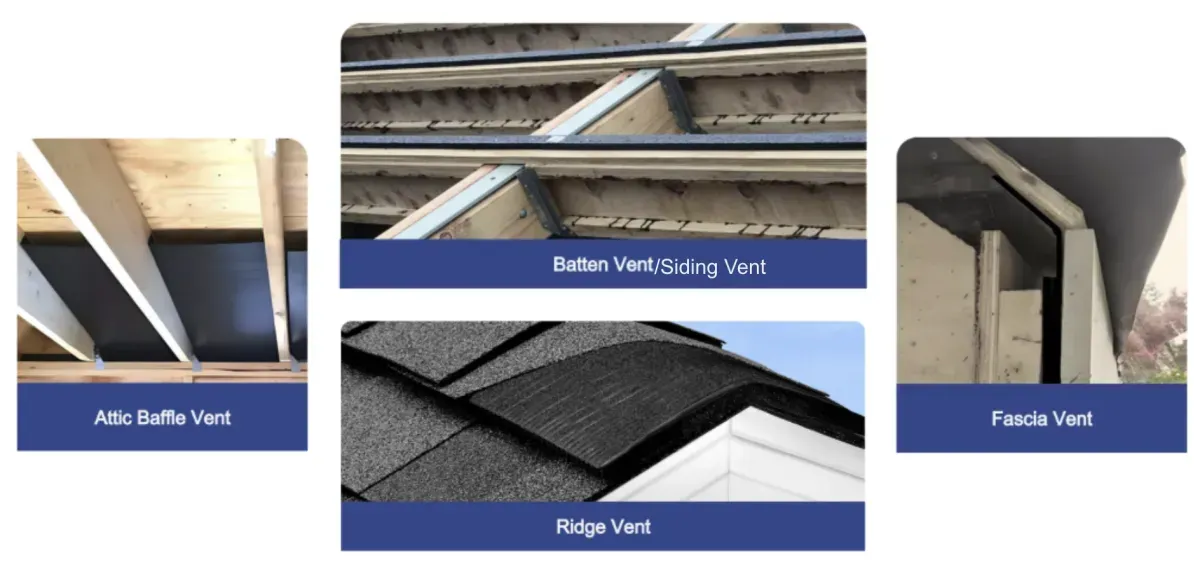
Ridge Vent
Pros: Provides continuous exhaust along the roof peak; virtually invisible under a ridge cap.
Cons: Ineffective without balanced intake; soffit vents must remain clear.
Best for: Asphalt-shingle and composite roofs with ample soffit intake ventilation.
Baffle Vent (Rafter Vent)
Pros: Maintains a clear air channel behind insulation; simple plastic or foam strips.
Cons: Requires installation in every rafter bay; adds labor time.
Best for: Attics with blown-in or dense-pack insulation, ensuring soffit intake stays open.
Batten Vent
Pros: Installs between battens under metal or tile roofs; low profile and durable.
Cons: Must be matched to roof profile; limited to certain roofing materials.
Best for: Metal and tile roofs where traditional soffit/ridge vents are impractical.
Fascia Vent
Pros: Integrates into the fascia board for intake ventilation; protects soffit edges.
Cons: Intake-only; must be paired with an exhaust vent (ridge, box, or turbine).
Best for: New constructions or re-roofs where soffits are absent or decorative.
Installation Best Practices
Balance Intake & Exhaust: Aim for a 1:300 net free-area ratio (1 sq ft of ventilation per 300 sq ft of attic floor).
Keep Channels Clear: Install baffles before adding insulation to preserve airflow from fascia or soffits.
Seal Flashings: Use roof-grade sealants around vent installations to prevent water intrusion.
High & Low Placement: Combine intake vents (fascia/soffit) at the eaves with exhaust vents (ridge) at the peak for optimal stack effect.
Maintenance & Cost Considerations
Typical Costs:
Ridge Vents: $2–$5 per linear foot installed
Baffle & Batten Vents: $5–$10 per bay or batten section
Fascia Vents: $3–$6 per linear foot
Annual Checkup: Clear debris, remove insect or bird nests, and confirm unobstructed channels.
No Filters Required: Unlike HVAC systems, roof insulation vents need only remain open and clean.
Conclusion:
Selecting and correctly installing the right mix of ridge, baffle, batten, fascia, and soffit vents transforms your attic into a self-regulating system—protecting insulation, reducing energy bills, and prolonging roof life. Make roof insulation vent planning a priority on your next project, and you’ll enjoy a cooler, drier, and more efficient home for years to come.
