Ice and Water Shield: Where to Use It + Install Guide
Ice and Water Shield for Roofing: The Complete Protection Guide for Homeowners and Contractors
Ice and water shield is a self-adhesive, fully waterproof roofing underlayment that seals around nails and goes at the eaves, valleys, and roof penetrations to stop ice dams and wind-driven rain from leaking into your roof deck. Every winter, thousands of homeowners wake up to water dripping through their ceiling. Every winter, thousands of homeowners wake up to water dripping through their ceiling. The cause is almost always the same: ice dams that have forced water underneath the shingles and into the roof deck. And the fix is almost always the same too: tearing off the damaged section and installing the protection that should have been there from the start.
Ice and water shield is the product that prevents this from happening. It is the most effective defense your roof has against ice dams, wind driven rain, and water infiltration at the most vulnerable points of the roofing system.
If you are building a new home, replacing a roof, or trying to understand why your current roof leaks every winter, this guide covers everything you need to know about ice and water shield: what it is, how it works, where it goes, what building codes require, and how it fits into a complete roofing underlayment system.
What Is Ice and Water Shield?
Ice and water shield is a self adhesive roofing underlayment membrane made from rubberized asphalt. It comes in rolls, typically 36 inches wide and 65 to 75 feet long, and has a sticky backing protected by a release film that you peel off during installation.
Once applied to the roof deck, the membrane bonds tightly to the plywood or OSB surface and creates a fully waterproof seal. Unlike synthetic underlayment, which is water resistant and sheds rain, ice and water shield is completely waterproof. It can handle standing water, water backing up from ice dams, and moisture being pushed upward by wind without letting a single drop through to the deck.
The feature that sets ice and water shield apart from every other underlayment is its self sealing ability around fasteners. When roofing nails or screws puncture through the membrane during shingle installation, the rubberized asphalt compresses around the shaft of the fastener and creates a watertight seal at the penetration point. No other type of underlayment does this. Felt absorbs water at nail holes. Synthetic sheds water away from nail holes but does not seal around them. Ice and water shield actively seals each one.
This self sealing property is what makes ice and water shield the only appropriate underlayment for areas where water can pool, back up, or be driven sideways into the roofing system.

How Ice Dams Destroy Roofs (And How Ice and Water Shield Stops Them)
To understand why ice and water shield matters, you need to understand how ice dams form and why they cause so much damage.
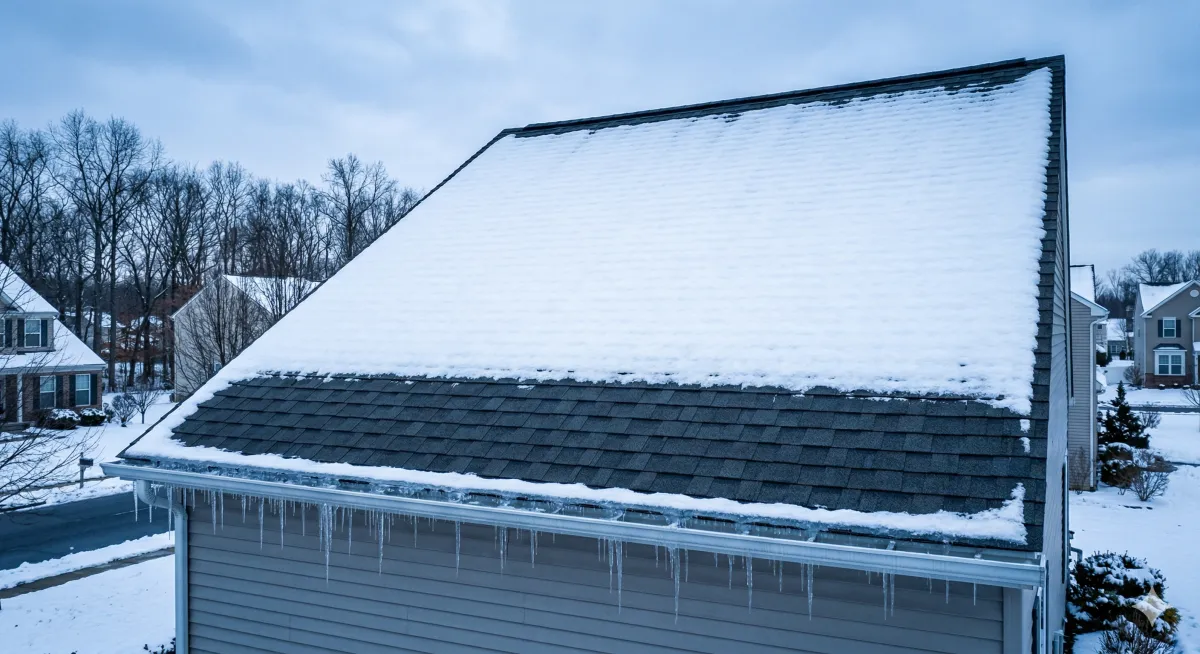
The ice dam cycle. During winter, heat from your living space rises through the attic and warms the roof deck. Snow sitting on the warm section of the roof melts. That meltwater runs down toward the eaves, which extend past the exterior wall and are not heated from below. When the water reaches the cold eave, it refreezes. Over time, this cycle of melting and refreezing builds a ridge of ice along the roof edge.
The damage. As the ice dam grows, more meltwater from above gets trapped behind it with nowhere to go. The water pools on the roof surface and, since shingles are not watertight, the standing water seeps underneath the shingle tabs and onto the roof deck. Without proper protection, that water soaks into the plywood, runs down the rafters, saturates the insulation, and drips through the ceiling into the rooms below.
The damage from a single ice dam event can include rotted roof decking, mold growth in the attic, stained and collapsed ceilings, damaged insulation, and ruined walls and flooring. Repair costs typically range from $2,000 to $10,000 depending on how far the water traveled before the damage was discovered.
How ice and water shield stops it. When ice and water shield is installed at the eaves, it creates a fully waterproof barrier across the entire area where ice dams form. Even when water backs up behind the dam and pools on the roof surface, it cannot penetrate through the membrane to the deck below. The water either sits on top of the membrane until it drains or evaporates, or it runs laterally off the edge of the membrane and into the gutter.
Because the membrane also seals around every nail that was driven through it during shingle installation, there are no weak points for water to exploit. The entire eave area is sealed tight.
This is why building codes in cold climates require ice and water shield at the eaves. It is not optional protection. It is the proven solution to one of the most common and expensive roofing problems in the northern half of the country.

Ice and Water Shield Is Not Just for Cold Climates
While ice dam protection is the most well known use, ice and water shield provides critical protection in warm climates too.
Wind driven rain. During hurricanes, tropical storms, and severe thunderstorms, wind can push rain sideways and even upward under shingle tabs. In coastal areas and hurricane zones, ice and water shield prevents this wind driven rain from reaching the deck. Florida building code requires a secondary water barrier across the entire roof deck in high velocity hurricane zones, and ice and water shield is the most common product used to meet this requirement.
Heavy rainfall. In regions with frequent heavy downpours (like the Gulf Coast and Southeast), water can overwhelm the drainage capacity of the shingle system, especially in valleys and at the eaves. Ice and water shield in these areas provides a fully waterproof backup that standard synthetic underlayment alone cannot match.
Low slope roof sections. Any portion of a roof with a pitch of 4:12 or less moves water slowly. That slow movement gives water more time to find its way under the shingles. Ice and water shield on low slope sections provides the waterproof protection these areas need regardless of climate.
Where Does Ice and Water Shield Go on a Roof?
Ice and water shield goes on the roof deck at the eaves (extending at least 24 inches past the interior wall line), in all valleys, around chimneys, skylights, vent pipes, and other penetrations, at dormers and wall intersections, and on any low slope sections under 4:12. On a metal roof, it goes in these same areas but must be a high temperature version rated to at least 240 degrees Fahrenheit. You do not need to cover the entire roof; it targets the high risk areas where water pools, backs up, or is driven under the roofing.
You do not need to cover the entire roof with ice and water shield on most projects. It is designed for the high risk areas where water is most likely to pool, back up, or be driven under the roofing material. Here is where it should go.
Eaves (Roof Edges)
This is the most important location. Ice and water shield should start at the eave edge and extend up the roof at least 24 inches past the interior wall line. This ensures the entire area where ice dams form is protected. In regions with heavy snowfall, extending the coverage 3 to 6 feet from the eave provides even better protection.
Valleys
Roof valleys funnel water from two converging roof planes into a single channel. The volume of water concentrated in a valley makes it one of the highest risk areas for leaks. Ice and water shield should run the full length of every valley, extending at least 18 inches on each side of the centerline. On roofs with long valleys or steep slopes that accelerate water flow, wider coverage is better.
Around Chimneys and Skylights
Every penetration through the roof deck is a potential leak point. Chimneys and skylights are especially problematic because their flashing systems are complex and can fail over time as caulk dries out, metal corrodes, or settling shifts the components. Ice and water shield wrapped tightly around the base of these penetrations provides a waterproof backup that catches water even when the primary flashing fails.
Vent Pipes and Other Penetrations
Plumbing vents, exhaust fans, and other small penetrations pass through the roof deck and rely on rubber boots or metal flashing to keep water out. These components degrade over time. A collar of ice and water shield around each penetration seals the deck even after the boot or flashing above begins to fail.
Dormers and Wall Intersections
Where a roof slope meets a vertical wall (such as around dormers or where an addition connects to the main roof), water can run down the wall and collect at the intersection. Ice and water shield along these transitions protects against water intrusion that standard step flashing alone may not fully prevent.
Low Slope Sections
Any roof area with a pitch below 4:12 should have ice and water shield for the reasons described above. Water moves slowly on low slopes and has more time to find openings in the shingle system.

How Ice and Water Shield Works With Synthetic Underlayment
The most effective roofing systems use ice and water shield and synthetic underlayment together, each covering the areas where it performs best.
Ice and water shield goes at the eaves, in the valleys, around all penetrations, at wall intersections, and on any low slope sections. This provides fully waterproof protection in every area where water is most likely to cause problems.
Synthetic underlayment covers the remaining field of the roof. It provides water resistant, tear resistant, UV stable protection across the open deck areas where water flows normally downhill and off the roof without pooling.
The synthetic overlaps the edges of the ice and water shield by at least 4 inches to create a continuous barrier with no gaps between the two materials.
This combination approach gives you the best of both products: waterproof sealing where you need it most and cost effective moisture resistance everywhere else. It is the standard recommended by most roofing manufacturers and the approach that satisfies building code requirements in virtually every climate zone.
At BCP Inc., we supply both synthetic underlayment (in Eco, Standard, and Premium grades) and recommend pairing them with quality ice and water shield in all the high risk areas described above.
Building Code Requirements for Ice and Water Shield
Building codes vary by location, but here are the general rules.
Cold climates. The International Residential Code (IRC) requires ice and water shield at the eaves in areas where the average January temperature is 25 degrees Fahrenheit or lower. The membrane must extend at least 24 inches past the interior wall line. This covers most of the northern United States.
Valleys. Many codes require ice and water shield in valleys regardless of climate, though some allow synthetic underlayment in valleys if the pitch is steep enough. Using ice and water shield in all valleys is the safer practice even where code does not explicitly require it.
Hurricane zones. Florida and other coastal areas have specific requirements for secondary water barriers that often mandate ice and water shield across the full deck or in extensive areas beyond just the eaves and valleys.
Around penetrations. Most codes require proper waterproofing around roof penetrations, and ice and water shield is the most common way to meet this requirement.
Always check your specific local code before starting a roofing project. Your roofing contractor should know the requirements for your area and ensure the installation meets or exceeds them.
Installation Tips for Ice and Water Shield
Proper installation is critical. The membrane must bond completely to the deck to create the waterproof seal it is designed for.
Start with a clean, dry deck. Remove all dust, dirt, loose nails, and old roofing materials from the deck surface. The adhesive needs direct contact with clean wood to bond properly. Any debris between the membrane and the deck creates a weak point.
Work in the right temperature. Most ice and water shield products require an ambient temperature of at least 40 degrees Fahrenheit for proper adhesion. In colder conditions, the adhesive may not bond fully. Some products require a primer on the deck in cold weather. Check the manufacturer's specifications.
Roll it out carefully. Peel the release film and press the membrane firmly onto the deck as you go. Work out any air bubbles or wrinkles by pressing from the center outward. Air pockets under the membrane reduce adhesion and can create channels where water moves laterally.
Overlap correctly. Horizontal seams should overlap by at least 3 inches. End laps (where two rolls meet along their short edges) should overlap by at least 6 inches. These overlaps must be pressed firmly to create a watertight bond between layers.
Do not leave it exposed too long. Most ice and water shield products are rated for 30 to 90 days of UV exposure. If the roofing material is not going on within that window, cover the exposed membrane with synthetic underlayment or tarps to protect it from UV degradation.
Common Ice and Water Shield Mistakes
Not extending far enough at the eaves. The minimum code requirement of 24 inches past the interior wall may not be enough in heavy snow regions. If ice dams in your area typically extend 2 to 3 feet up the roof, your ice and water shield should extend further than the minimum.
Skipping the valleys. Some contractors skip ice and water shield in valleys to save time and money, using only synthetic underlayment. This leaves the highest flow area on the roof without waterproof protection. Valleys should always have ice and water shield.
Poor adhesion from dirty decks. If the deck is not cleaned before installation, the membrane will not bond properly and can peel away over time. A few minutes of preparation prevents years of potential problems.
Using standard temperature product under metal roofing. If you are installing ice and water shield under a metal roof, you must use a high temperature version rated to at least 240 degrees Fahrenheit. Standard ice and water shield can soften and fail under the heat that metal panels generate.
Not sealing around penetrations. Every vent pipe, exhaust fan, and chimney needs ice and water shield integrated with the flashing. Simply running the membrane up to the edge of a penetration without wrapping around it leaves a gap that water will eventually find.
Frequently Asked Questions
Where does ice and water shield go on a metal roof? On a metal roof, ice and water shield goes in the same high risk areas, eaves, valleys, and around penetrations, but you must use a high temperature version rated to at least 240 degrees Fahrenheit, because metal panels generate heat that can cause standard membrane to soften and fail.
Is ice and water shield the same as peel and stick underlayment? Yes. "Peel and stick" is a common industry name for self adhesive underlayment, which includes ice and water shield products. The terms are used interchangeably.
Can I use ice and water shield on my entire roof? You can, and it is done in hurricane zones and some extreme cold climates. However, covering the entire roof with ice and water shield creates a vapor barrier that can trap moisture in the attic if ventilation is not adequate. For most homes, the combination of ice and water shield in high risk areas plus synthetic underlayment on the field is the better approach.
Does ice and water shield go over or under synthetic underlayment? Ice and water shield goes down first, directly on the roof deck. Synthetic underlayment then covers the remaining deck area and overlaps the edges of the ice and water shield by at least 4 inches.
How long does ice and water shield last? When properly installed under roofing material, ice and water shield lasts 30 to 40 years or more. It does not dry out, crack, or rot like felt underlayment.
Do I need ice and water shield if I live in a warm climate? Yes, but for different reasons than cold climates. In warm regions, ice and water shield protects against wind driven rain in valleys, around penetrations, and on low slope roof sections. It is also required by code in many hurricane prone areas.
How much does ice and water shield cost? A roll covering 200 to 225 square feet typically costs $90 to $150. Most residential roofs need 2 to 4 rolls for the eaves, valleys, and penetrations. That is roughly $180 to $600 in material cost for the high risk areas, which is a small price for the level of protection it provides.
Give Your Roof the Protection It Deserves
Ice and water shield is not an optional upgrade for nice to have protection. It is a required, code mandated component of a properly built roofing system that prevents the most common and expensive types of roof damage.
Every eave needs it. Every valley needs it. Every chimney, skylight, and vent pipe needs it. And when it is installed correctly alongside quality synthetic underlayment on the rest of the deck, your roof has the best possible defense against whatever weather comes its way.
At BCP Inc., we supply the roofing underlayment products that make a complete roof system work. From RoofLayer Eco for the field to ice and water shield in the critical zones, we help contractors and homeowners build roofs that hold up in the real world.
Need underlayment for your next project? Call us at 877-540-5678 or visit bcpinc.us/roof-underlayment to explore our full product line and request a quote.
